Sunday, May 31, 2009
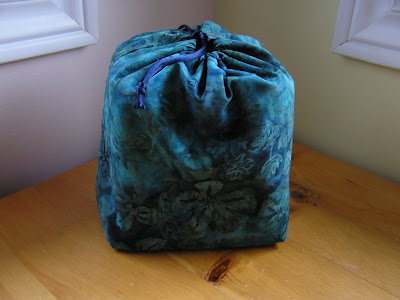
Drawstring Bag/Basket Tutorial
I designed this bag for a friend who is a dance teacher and carries CDs around with her so it’s sized to fit 10 CDs but if you don’t have the need to tote CDs around with you it would work equally well for carrying other stuff! There’s batting part way up to give it some structure but the top part is unstiffened so it can fold down like a cuff and turn your handy-dandy drawstring bag into a fabric basket. Let’s get started!
Step 1: Cut out the pieces. From the outer fabric cut a piece 11 by 23 inches. From the lining fabric cut a piece 11 by 21 inches. From quilt batting cut a piece 11 by 17 inches.
Step 2: Fold the outer piece, right sides together, so the short ends match up with each other. Fold the quilt batting around it so the centre fold of the batting lines up with the centre fold of the outer fabric. Did that make any sense? Hopefully the picture clarifies it all! Now sew up the side seams leaving 1 ½ inches unsewn at the open end. I used a ½ inch seam allowance for all seams.
Take the lining fabric, fold it in half, matching up the short ends and sew up the side seams all the way to the top.
Press all the side seams, including the unsewn bits, open as best you can.
Step 3: Fold the outer fabric/batting piece so that the side seam lines up with the centre fold and creates a corner. Pin in place. Measure 2 inches up from the corner, make a mark and draw a line across.
Sew across the line you drew and cut off the excess. Repeat for the other 3 corners (another outer/batting one plus the two lining ones).
Step 4: Turn the lining piece right side out and stuff it inside the outer piece. Line up the raw edges and pin together. Make sure to pin the side seams securely so the outside piece stays nice and aligned. Sew around the edge leaving a gap of a couple inches so you can turn the whole thing right side out when you’re done. Press the seam allowance towards the lining.
Step 5: Turn the whole thing right side out!
Step 6: This is a bit fiddly: making the drawstring casing. Fold the top seam about ½ an inch into the lining so outer fabric makes the top bit of the lining. Sew around the bag ½ an inch from the top edge to form the drawstring casing. (Sorry, I forgot to take a picture of this part. If you're confused try looking at the finished product pictures below and maybe that will help.)
Step 7: Thread a cord through the casing and knot to secure. I had knots at both ends but you could do a knot on one end only.
Step 8: Enjoy your bag!
I hope you liked (and understood!) this tutorial. If you try it I’d really appreciate hearing how it goes (and maybe pictures?).
Giveaway Day Continues...
So I've just finished going through all the blogs listed on the Sew Mama Sew Giveaway Day list. Yes, it took me four days to get through it all! I'm following lots of new blogs and was amazed at the creativity and generosity of all those hosting a giveaway.
As well as reading giveaway blogs I've been reading all the lovely & thoughtful comments that have been left here. I got home from work on Wednesday to find 55 new messages in my inbox! At first I thought the computer was acting up but there really were 55 e-mails for me! I was so touched by all the kind things you had to say, I really appreciate them all. Now that I'm done scouring the giveaway list I'm planning to come visit you all at your blogs (if you have one) and see what you're up to. And for anyone interested in my Etsy-shop-to-be, if you'd like to be notified when it opens please leave me a message here or at my e-mail (laura11arual at hotmail dot com) and I'd be happy to send out a "Grand Opening" e-mail. Hmmm... Grand Opening seems to suggest special or sale - I think I'll have to develop that idea further!
Stay tuned tomorrow for the giveaway winner!
Tuesday, May 26, 2009
Giveaway Day!
Have you heard about the giveaway day at Sew, Mama, Sew? When I heard about it it seemed like so much fun I wanted to play too! I'm planning to open an Etsy shop in July (post-summer holidays. No point opening a shop just to go on holidays, right?) and I thought this giveaway would be a perfect chance for you to get a sneek peek at what I'm working on for my store...
Included in this giveaway is a mini matchbook scrapbook, a set of 4 mini cards in a matchbox and 4 star shaped thumbtacks, all featuring beautiful chiyogami paper! I'm happy to ship anywhere so don't be shy! Leave a comment by May 31st for your chance to win this set. Come back June 1st to see if you've won (and maybe I'll have my next tutorial up by then!)
Monday, May 11, 2009
Felted-ness
Sorry for not posting last week - I had a friend visiting and so was busy with fun stuff like baking, shopping and having tea!
I've had these projects done for a while now but hadn't taken pictures till recently. I've been interesting in felting this winter/spring and these were my first attempts at felting something I had knitted. This bowl turned out well although I'm not sure what I'm going to use it for.
These nests were for using at daycare for spring & bird themes. I like these nests because they are hygenic and safe for the children to touch without me worrying about them putting their hands in their mouths or eating the nest! (I work with 18-30 month olds.) The eggs inside were made by felting wool around a plastic Easter egg or trying to wet felt an egg shape. Both were successful.
If you would like to make a felted nest too the tutorial I used is here:
Knitted Felted Nest.
Subscribe to:
Posts (Atom)