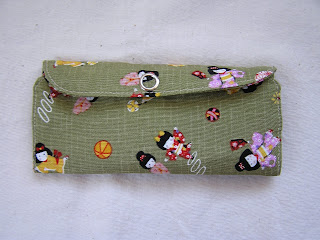
A couple weekends ago the local sewing store had a 50% off sale so I ran out and bought a bunch of needles for my sewing machine. After going to sewing class and listening to the importance of using a needle meant for the type of fabric you are sewing and changing them often I knew the only way I'd do this is if I actually had these needles on hand. So I stocked up. And then realized I needed somewhere to put all these needles, enter the needle case! Just what I like in a project - all materials were on hand and it's quick enough to complete in a day/few hours. And in case you want to make one too I've put together a tutorial.

What you need:
- Two pieces of fabric, 6 x 5 1/2 inches
- One piece of interfacing, slightly smaller then the fabric
- Thin elastic
- A snap (or other closure)
- Thread to match elastic and fabric
- Fabric marker (I use the purple disappearing ink kind)

Step 1:
Iron your interfacing to the backside of one piece of fabric.
Step 2:
Layout your needle cases and use them as a guideline when figuring out where to sew the elastic. Mark these places with your fabric marker. Using 6 Schmetz cases I marked dots at 5/8", 2", 3 3/8", 4 7/8" across the fabric at 1.25" & 3.5" from the bottom edge. The second picture shows (with ugly blue dots) where I had marked the sewing spots.
Step 3:
Sew the elastic on the dots you've marked leaving a little ease in each section of elastic so it bubbles up.

So when you're done it should look like this.
Step 4:
Take your two pieces of fabric and sandwich them right sides together. The ends of the elastic should stick out the sides. I wanted the top of my case to have curvy corners so I drew those on with my marker before sewing.
Sew around the edges leaving space for turning at the bottom. (After taking this picture I realized I hadn't left enough room and ripped some stitches out). Trim the seam allowances, including elastic, and clip the curves & corners.
Step 5:
Turn everything right side out and edge stitch the whole way round to close up the bottom seam and make it look nice. Here I am edge stitching the newly learned cheater way with a blind hem foot to guide my fabric.
This is how it should look now.
And when you slot your needle cases in:
Step 6:
Attach your snap according to the package directions and fold up your case. I pressed mine a bit to help make the folds
Enjoy!


What a great project! Great tutorial! I love the fabric you've chosen, too.
ReplyDeleteTake care,
Angela
I love this tutorial! I'm going to feature it today over at www.excellcrafts.blogspot.com so go grab a button!
ReplyDeleteReally useful idea! Thanks for the tutorial:).
ReplyDeleteVery interesting project for my embroidery needles !! Thanks a lot for the idea ;-)
ReplyDeleteA great reminder too to change your needle often. Something I need!
ReplyDeleteThis is a really great idea, I think I'll have to make one for both myself and my mother. We have boxes of needles floating around our houses and could use a way to organize them.
ReplyDeleteI made a couple of these, thanks to you, and love them!
ReplyDeleteI'm going to link to your blog tomorrow, so keep an eye out!
Thank you very much, what a great idea!
ReplyDeleteHey, that's pretty neat. I always wonder what to do with my needles, I always end up throwing them all in my sewing drawer.
ReplyDeleteWOW, what a wonderful idea, I have patterns for different kind of holder but never seen this one. THANK YOU EVER SO MUCH now to ~~~whip some up~~~
ReplyDeleteChris from WI, USA
gramachris@charter.net
Can't wait to make this for a gift for and friend. And me of course!!
ReplyDeletetengo que hacerlo ya gracias
ReplyDelete