Friday, July 24, 2009

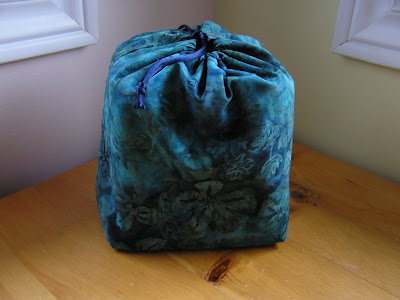
WIP


Here's a little peek at the supplies for a current WIP which should be completed shortly.

Wednesday, July 22, 2009

Back to sewing


Yesterday I got back to sewing for the first time in over a month! (yikes!) I was surprised that it felt so satisfying. Partly due to the fact that I was able to finish this project in an evening I'm sure! Sometimes I forget, until I'm into a project, how good it feels to make something and even better, to finish it!

This little boxy pouch is a present for a cousin who loves frogs. My first boxy pouch turned out so well I've been itching to make another. Since I like to have a purpose for creating (and I can only use so many little bags) it's taken me a while to sew this second pouch. And sewing for my cousin was a great reason to bring home some of this adorable frog fabric!

I tried using interfacing on this one (I didn't on my first) so it turned out stiffer (obviously the effect I was after!) and maybe smaller? Does interfacing create the need for bigger seam allowances? Anyways I was very pleased with how it turned out.

Instructions for making your own boxy pouch can be found here:
Boxy Pouch Tutorial

I used this tutorial for information on making the lining. So basically I sewed the boxy pouch from the first tutorial with the addition of a lining as explained in the second.

Sunday, July 12, 2009

A Month Later...

I can't believe it's been almost a month since my last post! I guess three weeks of holidays adds up pretty quickly. I had an amazing time in England with my mom and my sister but taking three weeks off at once created a lot of work before (getting ahead on things) and after (catching up). Although I've been back for a week it's been difficult dragging myself from vacation mode and back to reality. I hope to get back crafting soon and maybe open my Etsy shop (although the whole process of that seems pretty daunting, and like a lot of work, right now).

While I was away I had lots of adventures and great times - here are just a few:

Punting on the Cam in Cambridge.


Visiting little seaside towns like this one, Mevagissey.


Hiking parts of the South West Coast Path.


Swimming in the (cold but I've been in colder) ocean.


Viewing London from the giant London Eye.

Saturday, June 13, 2009

Holiday

I'm on holidays for the next 3 (!! yipee !!) weeks so I won't be on here much/at all... that also accounts for the lack of posts recently as I've been busy getting non-blog things done before I go away. One of my summer goals is to blog more so stay tuned!

Tuesday, June 9, 2009

Spring Evening

A lovely day for a walk (and ice cream!)...


Monday, June 1, 2009

And the Winner is...


The winning number was 182 which is hcotton! Congratulations! Thanks to everyone who played, I hope you'll be back to visit.

Sunday, May 31, 2009

Drawstring Bag/Basket Tutorial


I designed this bag for a friend who is a dance teacher and carries CDs around with her so it’s sized to fit 10 CDs but if you don’t have the need to tote CDs around with you it would work equally well for carrying other stuff! There’s batting part way up to give it some structure but the top part is unstiffened so it can fold down like a cuff and turn your handy-dandy drawstring bag into a fabric basket. Let’s get started!

Step 1: Cut out the pieces. From the outer fabric cut a piece 11 by 23 inches. From the lining fabric cut a piece 11 by 21 inches. From quilt batting cut a piece 11 by 17 inches.

Step 2: Fold the outer piece, right sides together, so the short ends match up with each other. Fold the quilt batting around it so the centre fold of the batting lines up with the centre fold of the outer fabric. Did that make any sense? Hopefully the picture clarifies it all! Now sew up the side seams leaving 1 ½ inches unsewn at the open end. I used a ½ inch seam allowance for all seams.


Take the lining fabric, fold it in half, matching up the short ends and sew up the side seams all the way to the top.


Press all the side seams, including the unsewn bits, open as best you can.


Step 3: Fold the outer fabric/batting piece so that the side seam lines up with the centre fold and creates a corner. Pin in place. Measure 2 inches up from the corner, make a mark and draw a line across.


Sew across the line you drew and cut off the excess. Repeat for the other 3 corners (another outer/batting one plus the two lining ones).


Step 4: Turn the lining piece right side out and stuff it inside the outer piece. Line up the raw edges and pin together. Make sure to pin the side seams securely so the outside piece stays nice and aligned. Sew around the edge leaving a gap of a couple inches so you can turn the whole thing right side out when you’re done. Press the seam allowance towards the lining.


Step 5: Turn the whole thing right side out!

Step 6: This is a bit fiddly: making the drawstring casing. Fold the top seam about ½ an inch into the lining so outer fabric makes the top bit of the lining. Sew around the bag ½ an inch from the top edge to form the drawstring casing. (Sorry, I forgot to take a picture of this part. If you're confused try looking at the finished product pictures below and maybe that will help.)

Step 7: Thread a cord through the casing and knot to secure. I had knots at both ends but you could do a knot on one end only.


Step 8: Enjoy your bag!

I hope you liked (and understood!) this tutorial. If you try it I’d really appreciate hearing how it goes (and maybe pictures?).