Showing posts with label tutorial. Show all posts

Tuesday, March 20, 2012

Phone Charging Pocket Tutorial

Why leave your charging phone on the counter when you can put it in a cute pocket like this?


This was one of my Making Day projects.  The one I promised you a tutorial for... you know, three weeks ago (sorry about that).

Want to make one?  Let's get started!

You'll need:
  • Fabric (I used a print & a solid)
  • Fusible interfacing (heavyish)
  • Sewing machine or needle and thread
Step 1: Cut out a 12" x 6" rectangle from each of: outer fabric, lining fabric and interfacing.


Step 2: (not pictured) Fuse interfacing to the wrong side of one of the fabric pieces.

Step 3: Pin fabric right sides together & sew around the rectangle with a 1/4" seam allowance.  Leave a few inches unsewn for a turning gap.  Clip the corners.


Step 4: Turn piece right side out and press.


Step 5: Top stitch around piece to close gap and give everything a nice finished look.


Step 6: Fold up the bottom of the rectangle to create a pocket.  I test fitted with my phone and eyeballed it.  Sew on top of the topstitching along each side of the pocket.


Step 7:  Another test fitting step.  Place the plug for your charger at the top of the pocket...


...trace around it.
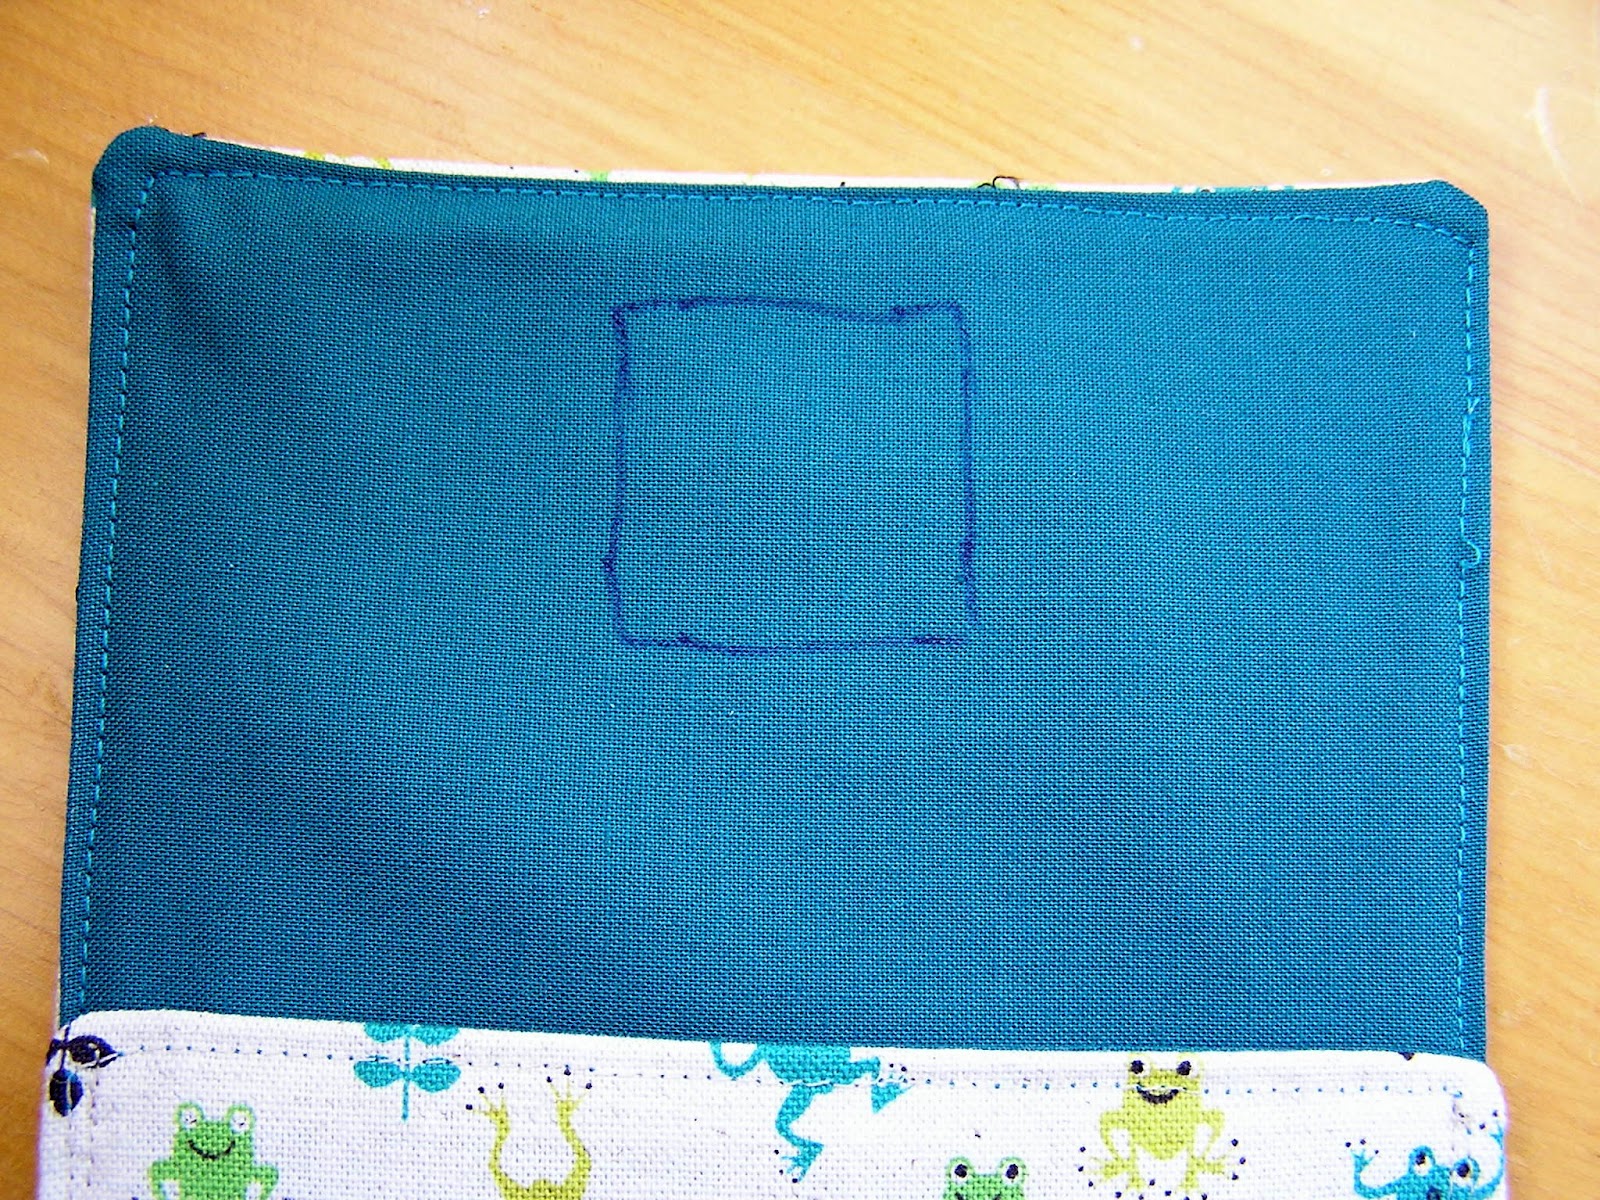

...use a tight zig zag stitch to sew around the square (or other shape) you just traced.


...use a seam ripper to start the hole and then cut close to the stitching with small scissors.

Ta-da! Plug in your phone then tuck it, and all the wiring, into your cute pocket.

Sunday, June 5, 2011

Chiyogami Challenge - Project #1

As I mentioned yesterday I've finished the first project in my chiyogami challenge.  Can you spot it?


Yep, a little frame!


Want to make one too?  

You'll need:
  • 3" square of decorative paper
  • 2.5" square of heavy card (mine is maybe mat board)
  • glue, scissors, craft knife


1. Cut a square out of the centre of your card.
2. Cut an X out of your decorative paper (I put the frame on top & eyeballed it).
3. Clip the corners off the outside paper as well as the triangles created by the X and fold the onto the frame.
4. Glue everything down.

I've got mine propped up with other photo frames but I think these would be great scrapbook embellishments as well!

Thursday, February 3, 2011

Needle Case Tutorial

A couple weekends ago the local sewing store had a 50% off sale so I ran out and bought a bunch of needles for my sewing machine.  After going to sewing class and listening to the importance of using a needle meant for the type of fabric you are sewing and changing them often I knew the only way I'd do this is if I actually had these needles on hand.  So I stocked up.  And then realized I needed somewhere to put all these needles, enter the needle case!  Just what I like in a project - all materials were on hand and it's quick enough to complete in a day/few hours.  And in case you want to make one too I've put together a tutorial.


What you need:
  • Two pieces of fabric, 6 x 5 1/2 inches
  • One piece of interfacing, slightly smaller then the fabric
  • Thin elastic
  • A snap (or other closure)
  • Thread to match elastic and fabric
  • Fabric marker (I use the purple disappearing ink kind)


Step 1:
Iron your interfacing to the backside of one piece of fabric.


Step 2:
Layout your needle cases and use them as a guideline when figuring out where to sew the elastic.  Mark these places with your fabric marker. Using 6 Schmetz cases I marked dots at 5/8", 2", 3 3/8", 4 7/8" across the fabric at 1.25" & 3.5" from the bottom edge.  The second picture shows (with ugly blue dots) where I had marked the sewing spots.


Step 3:
Sew the elastic on the dots you've marked leaving a little ease in each section of elastic so it bubbles up.


So when you're done it should look like this.


Step 4:
Take your two pieces of fabric and sandwich them right sides together.  The ends of the elastic should stick out the sides.  I wanted the top of my case to have curvy corners so I drew those on with my marker before sewing. 


Sew around the edges leaving space for turning at the bottom.  (After taking this picture I realized I hadn't left enough room and ripped some stitches out).  Trim the seam allowances, including elastic, and clip the curves & corners.


Step 5:
Turn everything right side out and edge stitch the whole way round to close up the bottom seam and make it look nice.  Here I am edge stitching the newly learned cheater way with a blind hem foot to guide my fabric.


This is how it should look now.


And when you slot your needle cases in:


Step 6:
Attach your snap according to the package directions and fold up your case.  I pressed mine a bit to help make the folds


Enjoy!

Sunday, December 19, 2010

Christmas Embroidery


I don't remember where the inspiration for this Christmas embroidery came from - maybe a card in a store - but I am so happy with how it turned out!  At first I thought I would put loops of ribbon in the top to make them into ornaments but I forgot to on the first one and in the end I like them better this way.  Nice to decorate something other then the tree and easier to keep the letters in order (really, how was I planning to hang letters in a row on a tree?).  After I finished "JOY" I liked it so much I made "NOEL" as well!


Would you like to make a set too?  Or maybe put it on your to do list for next year? Here are the patterns I used.  Print on 8 1/2 x 11 it will make letters just under 4 inches tall.


I'm not an embroiderer usually so I think I went about this the wrong way by cutting the letters out of felt first and then embroidering them.  I'm not going to give specific instructions, just some guidelines on what I did which you can follow or not!
  • I used white wool felt for the letters, cut two of each letter you are making
  • Embroider the leaves and berries on each letter, I just did it on one side but you could do both.
  • I used green thread for the lazy daisy/backstitched leaves, red thread for the french knot berries and white thread to whipstitch or blanketstitch the pieces together
  • Add a little stuffing to the letters as you go (much easier then trying to get in all those nooks and crannies at the end)
So you can see how I did the embroider I took a picture of the "O" up close.


Happy stitching!

    Thursday, December 16, 2010

    Star Ornament Tutorial


    This is one of the projects I came up with to use all the lovely chiyogami paper I got at the Paper Place.  I think it would look great with scrapbooking patterned paper, gift wrap or coloured foil so no worries if you don't have any chiyogami on hand!

    What you need:
    1. Paper (I'm using chiyogami here but use what you have)
    2. Gold thread
    3. Seed beads to compliment your paper (these are size 8/0 seed beads)
    4. Star punch (or use scissors and cut your own)
    5. Glue stick (not pictured, I use UHU)

    Step 1:
    Cut a piece of gold thread about 14" long.  Fold in half and tie a knot around the 3 1/2" mark.


    Step 2: 
    Thread 5 beads onto the doubled thread, slide up to the knot and tie another at the other end of the beads.  A little finicky but it doesn't need to be too tight to the beads.  Snip off the excess thread and set aside.


    Step 3:
    Punch (or cut) 5 stars from your paper and fold them all in half.


    Step 4:
    Glue the stars, wrong side together, to join them.  Stop before you join the final halves.  Hopefully the pictures makes sense.


    Step 5:
    Before gluing the last halves together lay the gold thread in the creases of the paper.  The fold in the thread will be the top of the ornament and the beads will be the bottom.  Line the knot up to be at the bottom of the star.  Then glue the last bit together and you're done!


    Hang and enjoy!


    Tuesday, April 6, 2010

    Skirt for Spring!


    The recent warm weather had me digging out spring/summer clothes and enjoying wearing skirts again!  (I do wear skirts in the winter but not too often as it's so cold, even with tights, on the legs!)  I was also busy sewing skirts.  The one in the picture is based on a style I saw at Old Navy.  (Please note the shirt is tucked in for your skirt viewing pleasure only - don't criticize my fashion sense!)  I like it because I got to do some shirring (always fun!), use my rotary cutter (Christmas present - I love it!) and it's super comfy to wear.  I already have ideas about how I would do it differently next time and got some brown jersey to do just that.  Would anyone be interested in a tutorial?  I have this grand plan in mind that I could do a series of spring/summer skirt tutorials but we'll see how it pans out.  Skirt two is in the works so it could be a possibility! 

    Wednesday, February 10, 2010

    Doll Mittens - Tutorial


    I made these into Canada/Olympic mittens for a Cabbage Patch Kid but they could be used on any soft doll in the 16" - 20" range.

    I used Cascade 220 and 4.5mm needles.  You could always vary the yarn weight and needle size to make the mittens bigger/smaller!
    Cast on 22 stitches and join in the round. **

    Knit the body of the mitten:
    Rounds 1-6:  K1, P1 rib.
    Rounds 7-8: knit
    Round 9: K2, K4 onto waste yarn, knit to end with regular yarn.

    Continue knitting in the round until the mitten is 3 inches from the edge of the cuff.

    K1, K2tog for 2 rounds
    K2tog for 1 round
    Cut yarn and thread through remaining stitches, pull tight and sew the end in.

    Make the thumb:
    Unpick the stiches on the waste yarn and put on to two needles, picking up an extra stitch at each end of the hole (10 stitches total).

    Round 1: K3, K2tog. Repeat.
    Continue knitting for 5-6 rounds.
    K2tog, K1 for one round.

    Cut yarn and thread through remaining stitches, pull tight and sew the end in.
    Sew in any remaining yarn ends and knit the matching mitt!

    **I used to have a hard time keeping the stitches tightly together when joining in the round until I read about this trick: Cast on an extra stitch (23 for these mitts).  Divide the stitches onto three needles as normal.  Without using the fourth needle knit the first stitch onto the last needle and cast off one stitch.  Now you should have 22 stitches on three needles.  Pick up your fourth needle and continue as usual!

    Tuesday, January 26, 2010

    Flower Brooch Tutorial

    One of the things on my 2010 crafty list was to make a brooch to wear with my (cream) sweater. Originally I was planning to make it out of felt, but seeing as the sweater is wool I thought it might be better to have more contrast.  So I came up with this:

     
    To make one of your own you need:
    • Scrap piece of linen (I used teal)
    • Scrap of natural coloured canvas
    • A bit of lace (two types)
    • Brooch back or safety pin
    • Scrap of felt
    • Matching thread

    Step 1: Cut the pieces
    Cut three blobby shapes out of the teal linen and two out of the canvas.  The smallest blob is about 1.5 inches across and the largest is about 3.5 inches.  The layers should alternate colours so the first blob is cut out of coloured linen, the second out of natural canvas, etc.
     
    Cut a piece of lace, 7-8 inches long, from each of the two laces.  I used one that had thicker thread (almost crochet looking) and one that had thinner thread.
     
     
    Here's another shot of the blobs, with a ruler for reference:


    Step 2:  Sew and gather the blobs.
    Using matching thread, sew around the blob, about .5 inch from the edge.  Use a largish stitch length and don't backstitch at the ends.  Holding onto both bobbin threads (the ones on the underside) or the top threads loosely gather the blob to your liking and knot the ends.  (Knot the bobbin threads together and the top threads together, two knots per blob.)


    Step 3:  Sew and gather the lace.
    Layer the two pieces of lace on top of one another and sew along the "flat" edge without backstitching at the ends.  Gather tightly and form the lace into a rosette.  Secure the lace in this shape by taking stitches on the underside.


    Now your pieces should look like this:


    Step 4:  Layer and secure the blobs.
    Layer the blobs on top of one another, alternating colours and take a few stitches to secure in place (they will be covered later so thread colour doesn't matter.)


    Step 5:  Add the rosette.
    Place the lace rosette in the middle of the blobs and take a few stitches to secure in place.


    Step 6:  Attach a pin.
    Ideally I guess you would use a flat backed brooch pin but I didn't have one on hand so I used a safety pin.  Either way, secure your pin of choice in place with some (or in my case a lot of) stitches.
     
     
    Step 7:  Make the back look pretty.
    Not that anyone will see it, but I thought it would be nice to finish off the back to hide all the stitches.  Cut a small leaf shape from the felt, making sure it fits between the pin ends, and stitch in place using matching thread.
     
     
    And you're done!  Hooray!